 shield
Crypto Payment Widget: Add a Crypto Checkout to Any Website
A crypto payment widget is a small piece of code you paste into your website that shows a crypto checkout to your buyers. No redirect to another site, no plugin to install, no payments backend to build. The buyer clicks, pays from their wallet, and you get paid.
This guide shows what a crypto payment widget is, what each kind looks like, what your buyer sees from click to “paid”, how to add one to the site you already have, and what to check before you trust one with your sales. Every screenshot below is the real Shieldz widget.
In short: paste one script tag, then add a buy button, an inline checkout or a call from your own cart. Buyers pay from their own wallet in the coin they hold. The money lands in your wallet, not ours. You pay no platform fee.
On this page
- What a crypto payment widget is
- See it in action
- The three kinds of crypto payment widget
- What your buyer sees, step by step
- How to add a crypto payment widget
- Adding it to WordPress, Webflow, Framer and React
- Six things to check before you choose one
- What it costs, with a worked example
- What people sell with it
- Widget, payment link, API or plugin?
- Common mistakes
- FAQ
What a crypto payment widget is
A crypto payment widget sits between your web page and a payment gateway. Your page stays yours. The widget adds the checkout on top of it, or inside it, and the gateway behind it does the crypto work.
It does four jobs:
- Shows the checkout on your page, as a popup or as part of the page.
- Gets the price for what the buyer is paying for.
- Takes the payment, from a browser wallet or by showing an address and QR code.
- Tells you it was paid, so you can ship the order.
The gateway behind the widget decides the things that matter most: who holds the money, which coins work, and what it costs. Two widgets can look the same and work very differently. The checklist below is how you tell them apart.
How it works under the hood
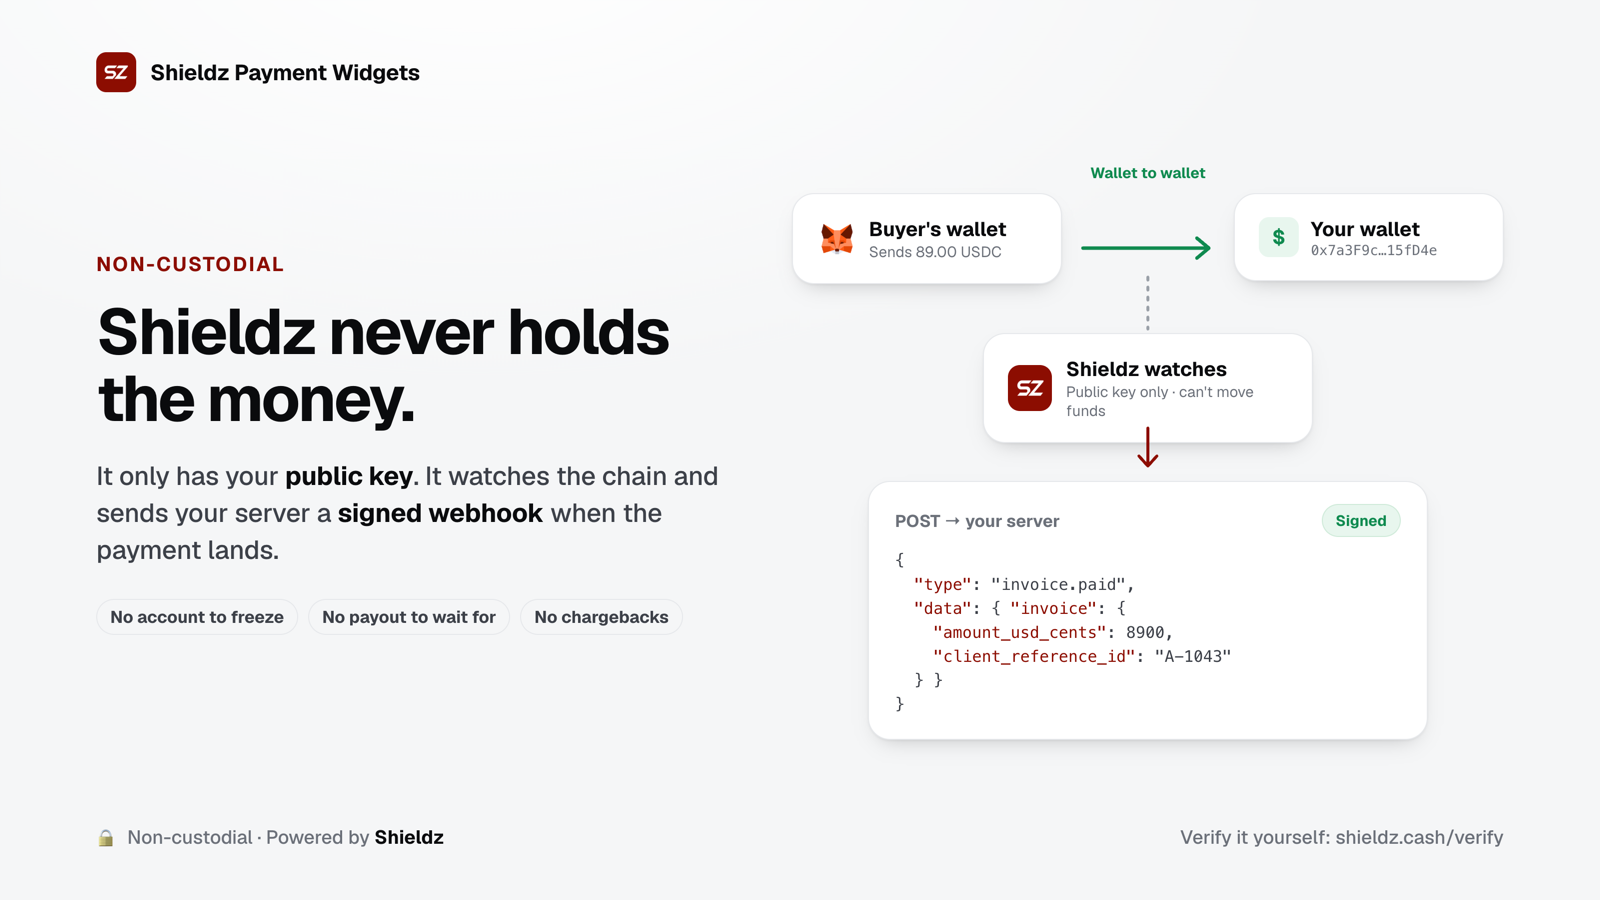
With Shieldz, one payment goes like this:
- Your page loads
widget.js. It finds your buttons and checkout spots and wires them up. - The buyer clicks. The widget opens the checkout in a secure frame from
shieldz.cash. Your page never touches wallet keys or payment data. - The checkout looks up the price in your catalog and shows it.
- The buyer pays from their wallet straight to yours. If they pay in another coin, a non-custodial swap protocol converts it on the way.
- Shieldz sees the payment on-chain and sends your server a signed
invoice.paidwebhook. Your page also gets apaidevent for the thank-you screen.
At no point does the money pass through an account Shieldz controls. Shieldz only has your public key or address.
See it in action
Here is the full setup, from adding a product to a paid order, in about a minute:
You can also click through every widget yourself on the Shieldz home page. It’s a demo, so nothing is created and no money moves.
The three kinds of crypto payment widget
Every Shieldz widget starts with the same line, once per page:
<script src="https://shieldz.cash/widget.js" defer></script>Then you choose how the checkout shows up.
1. Buy button
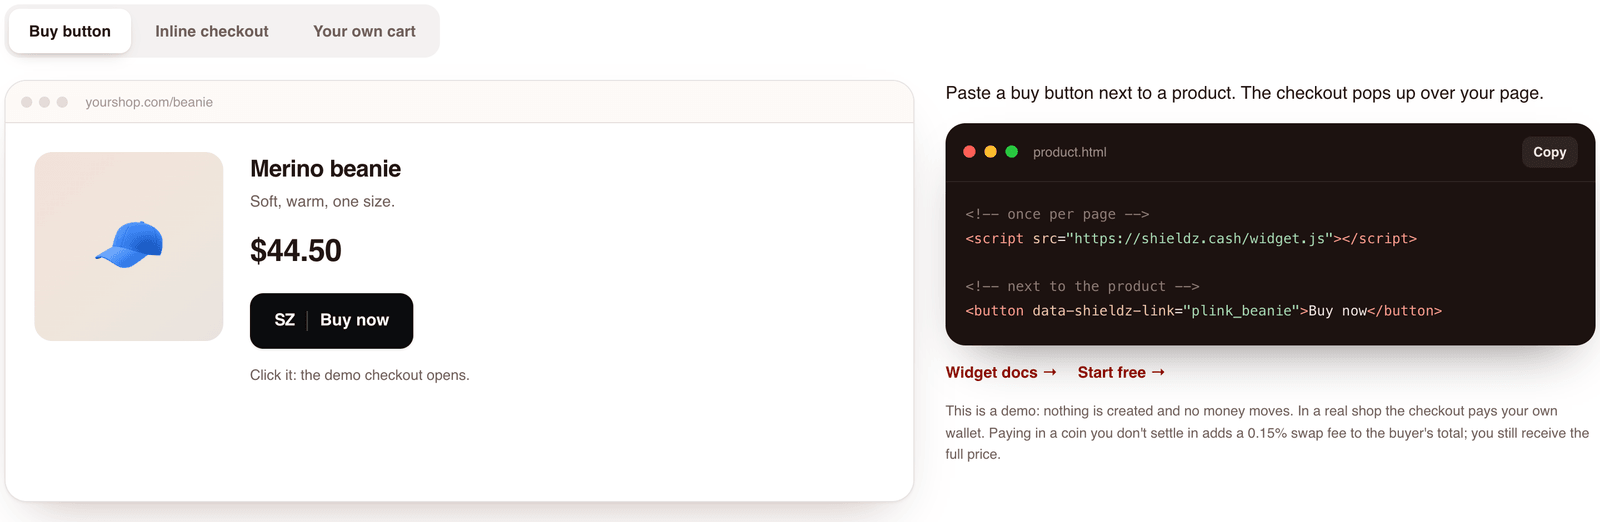
A button next to a product. A click opens the checkout as a popup over your page, so the buyer never leaves your site.
<button data-shieldz-link="plink_...">Buy now</button>The plink_... id is a payment link you make in your dashboard. It points at a product and its price, so the button itself carries no amount.
Best for: one product per page. Ebooks, courses, templates, license keys, tickets, a single piece of merch.
2. Inline checkout
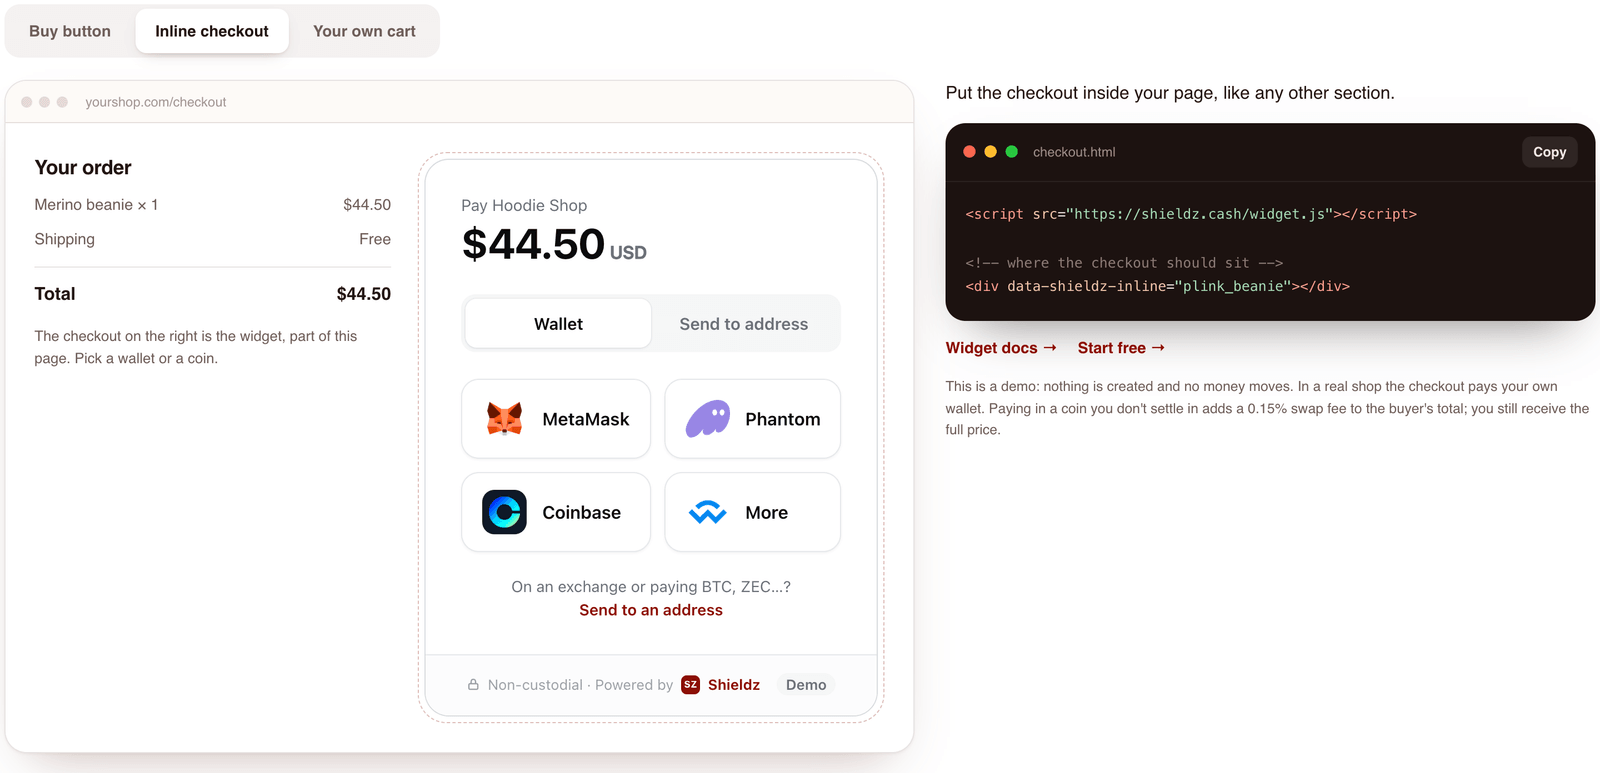
The checkout is drawn inside your page, like any other section. It grows and shrinks as the buyer moves through it, so there’s never a scrollbar inside a box.
<div data-shieldz-inline="plink_..."></div>Best for: a dedicated “pay”, “order” or “checkout” page, where the payment is the main thing on screen.
3. Your own cart
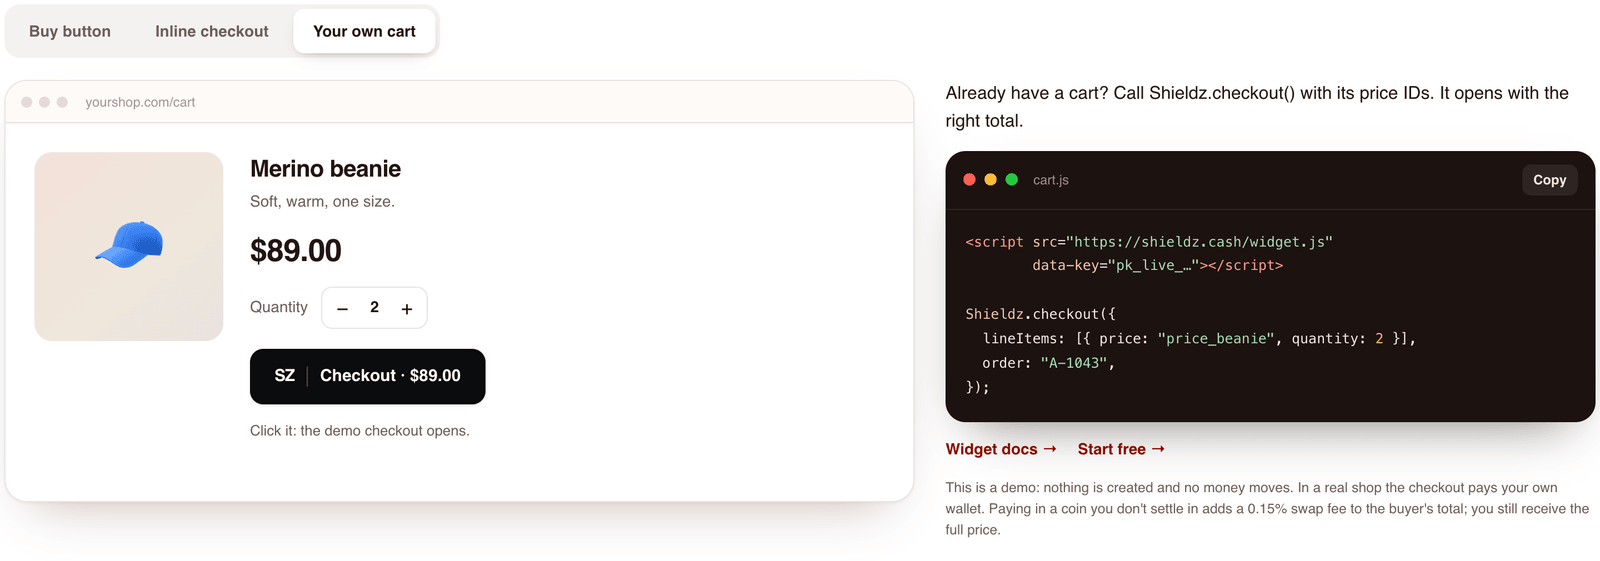
If your site already has a cart, keep it. The widget only handles the payment. Load the script with your publishable shop key and pass it the price IDs in the cart:
<script src="https://shieldz.cash/widget.js" data-key="pk_live_..." defer></script>
<script>
  document.querySelector("#checkout").addEventListener("click", () => {
    Shieldz.checkout({
      lineItems: [{ price: "price_...", quantity: 2 }],
      order: "A-1043", // your cart or order id
    });
  });
</script>
The checkout opens with the right total for those items. Turn this on first in the dashboard (Quick start → Widget → carts of price IDs).
Best for: stores with many products, quantities or bundles, and anything with a cart already built.
Which one should you use?
| Buy button | Inline checkout | Your own cart | |
|---|---|---|---|
| What you paste | A <button> | A <div> | A Shieldz.checkout() call |
| Where the checkout shows | Popup over the page | Inside the page | Popup over the page |
| Number of products | One per button | One per spot | Any, with quantities |
| Key needed in the page | None | None | Publishable pk_live_... |
| Coding needed | None | None | A few lines of JavaScript |
You can mix them on one site. A buy button on each product page and an inline checkout on a “support us” page work fine side by side.
What your buyer sees, step by step
A widget is only as good as the checkout it opens. Here is the Shieldz checkout from the buyer’s side.
Step 1: the checkout opens
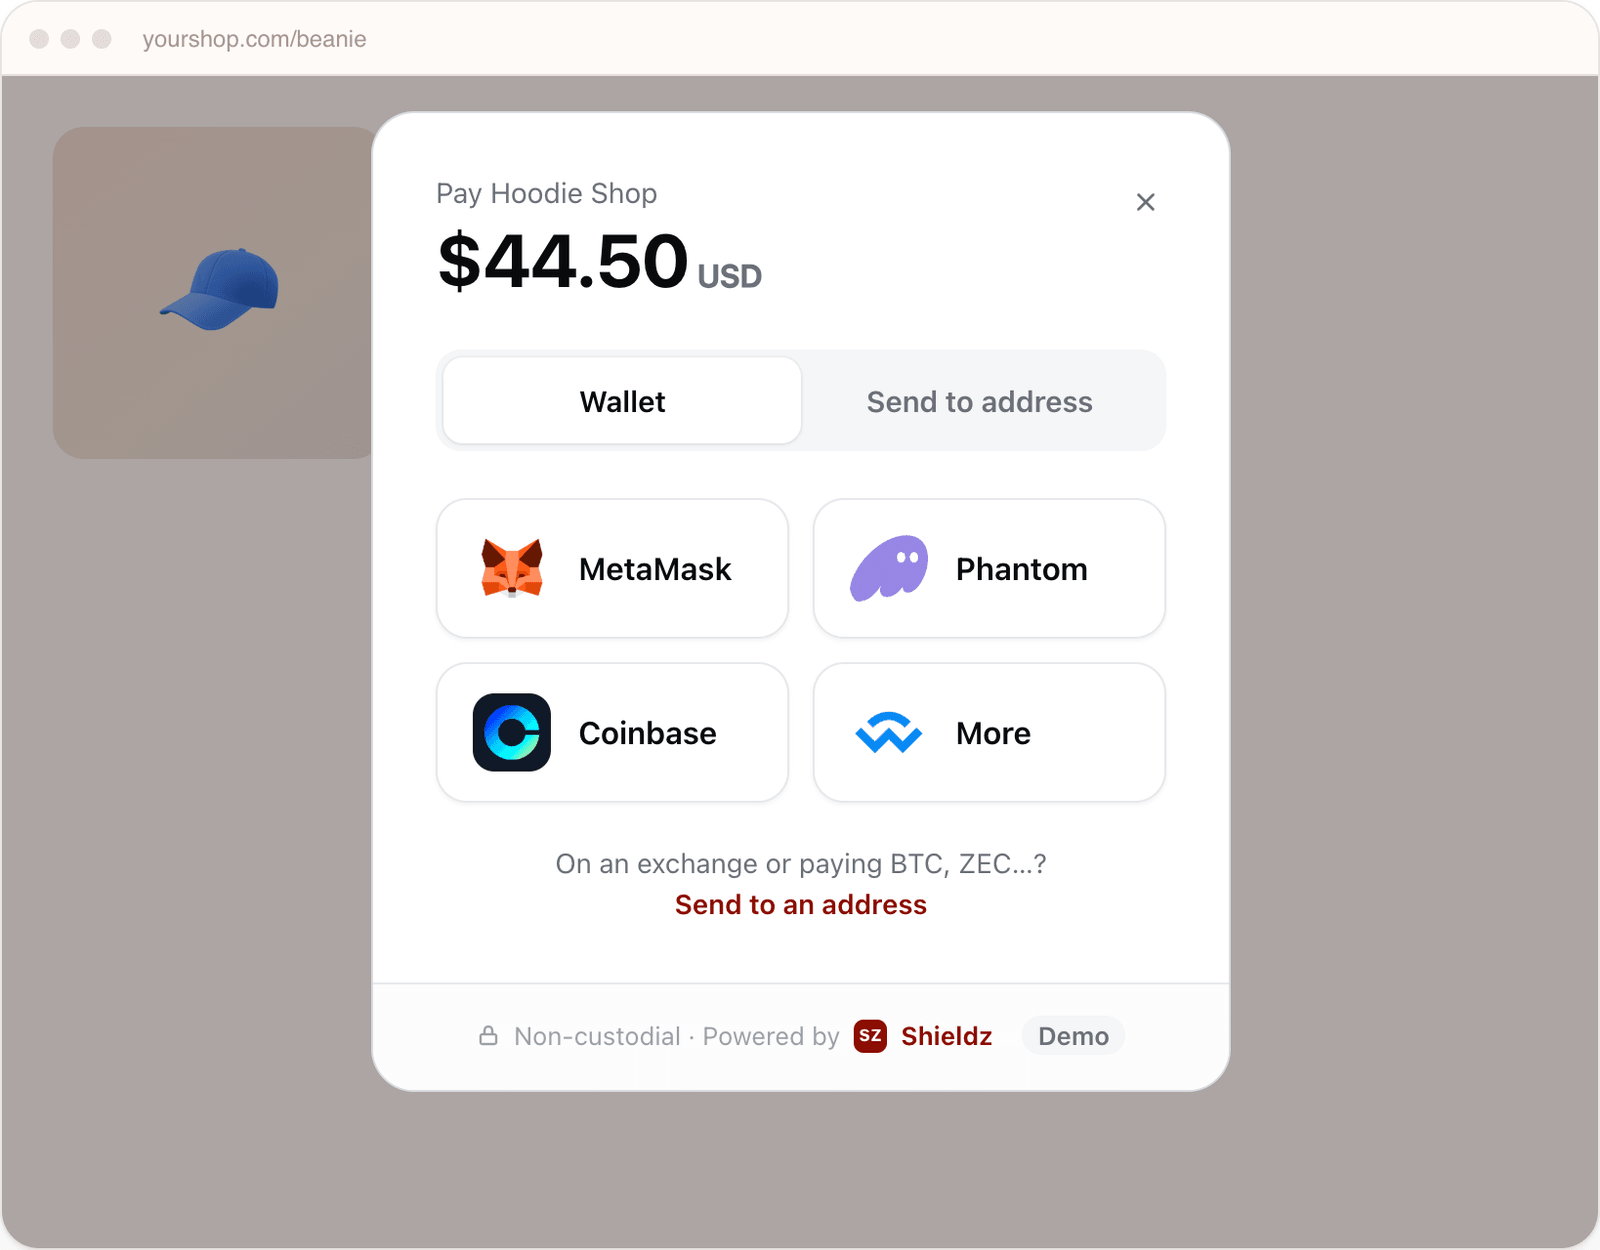
The buyer sees your shop name and the total. They get two ways to pay:
- Wallet: MetaMask, Phantom, Coinbase Wallet, or More for WalletConnect and other wallets. On a phone, the buyer can open the checkout in their wallet app.
- Send to address: for exchanges and coins that don’t have a browser wallet.
Step 2a: paying from a wallet
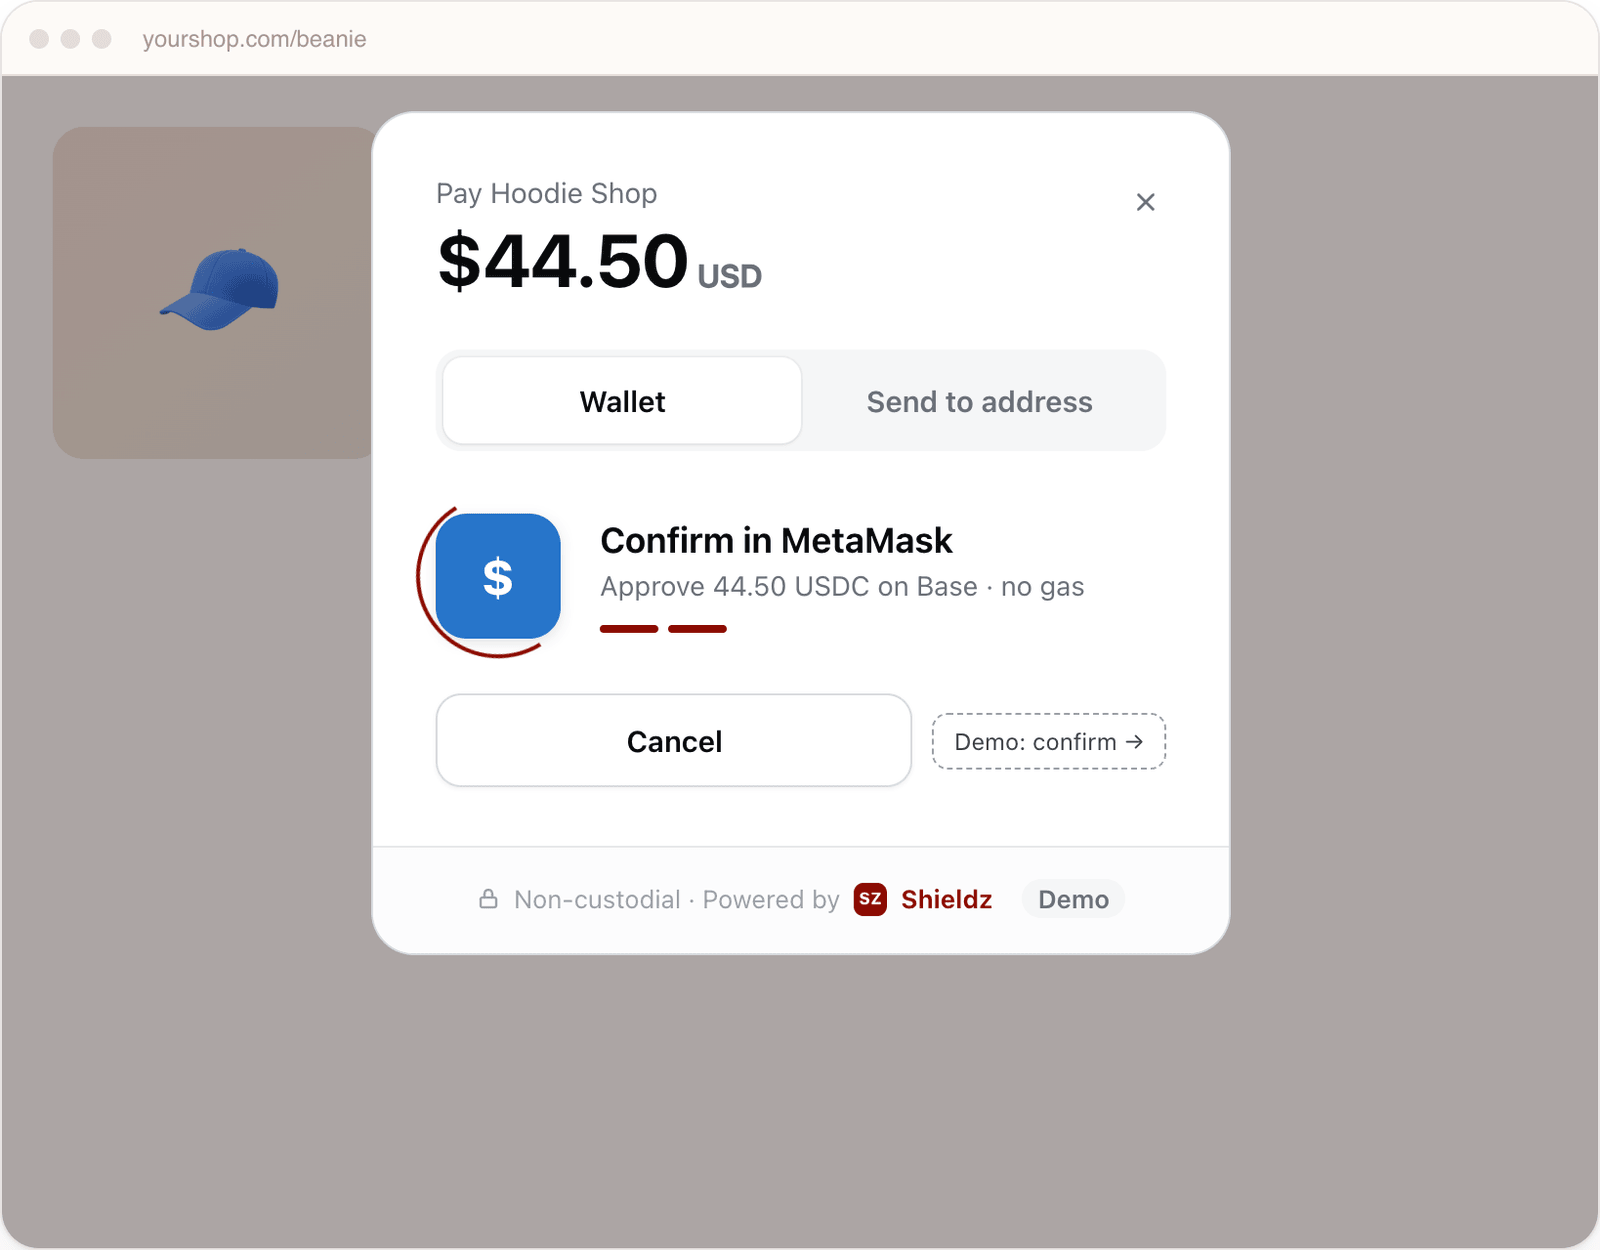
The buyer connects, then approves the transfer in their wallet. The checkout says exactly what they’re signing: here, 44.50 USDC on Base.
Step 2b: paying by address and QR code
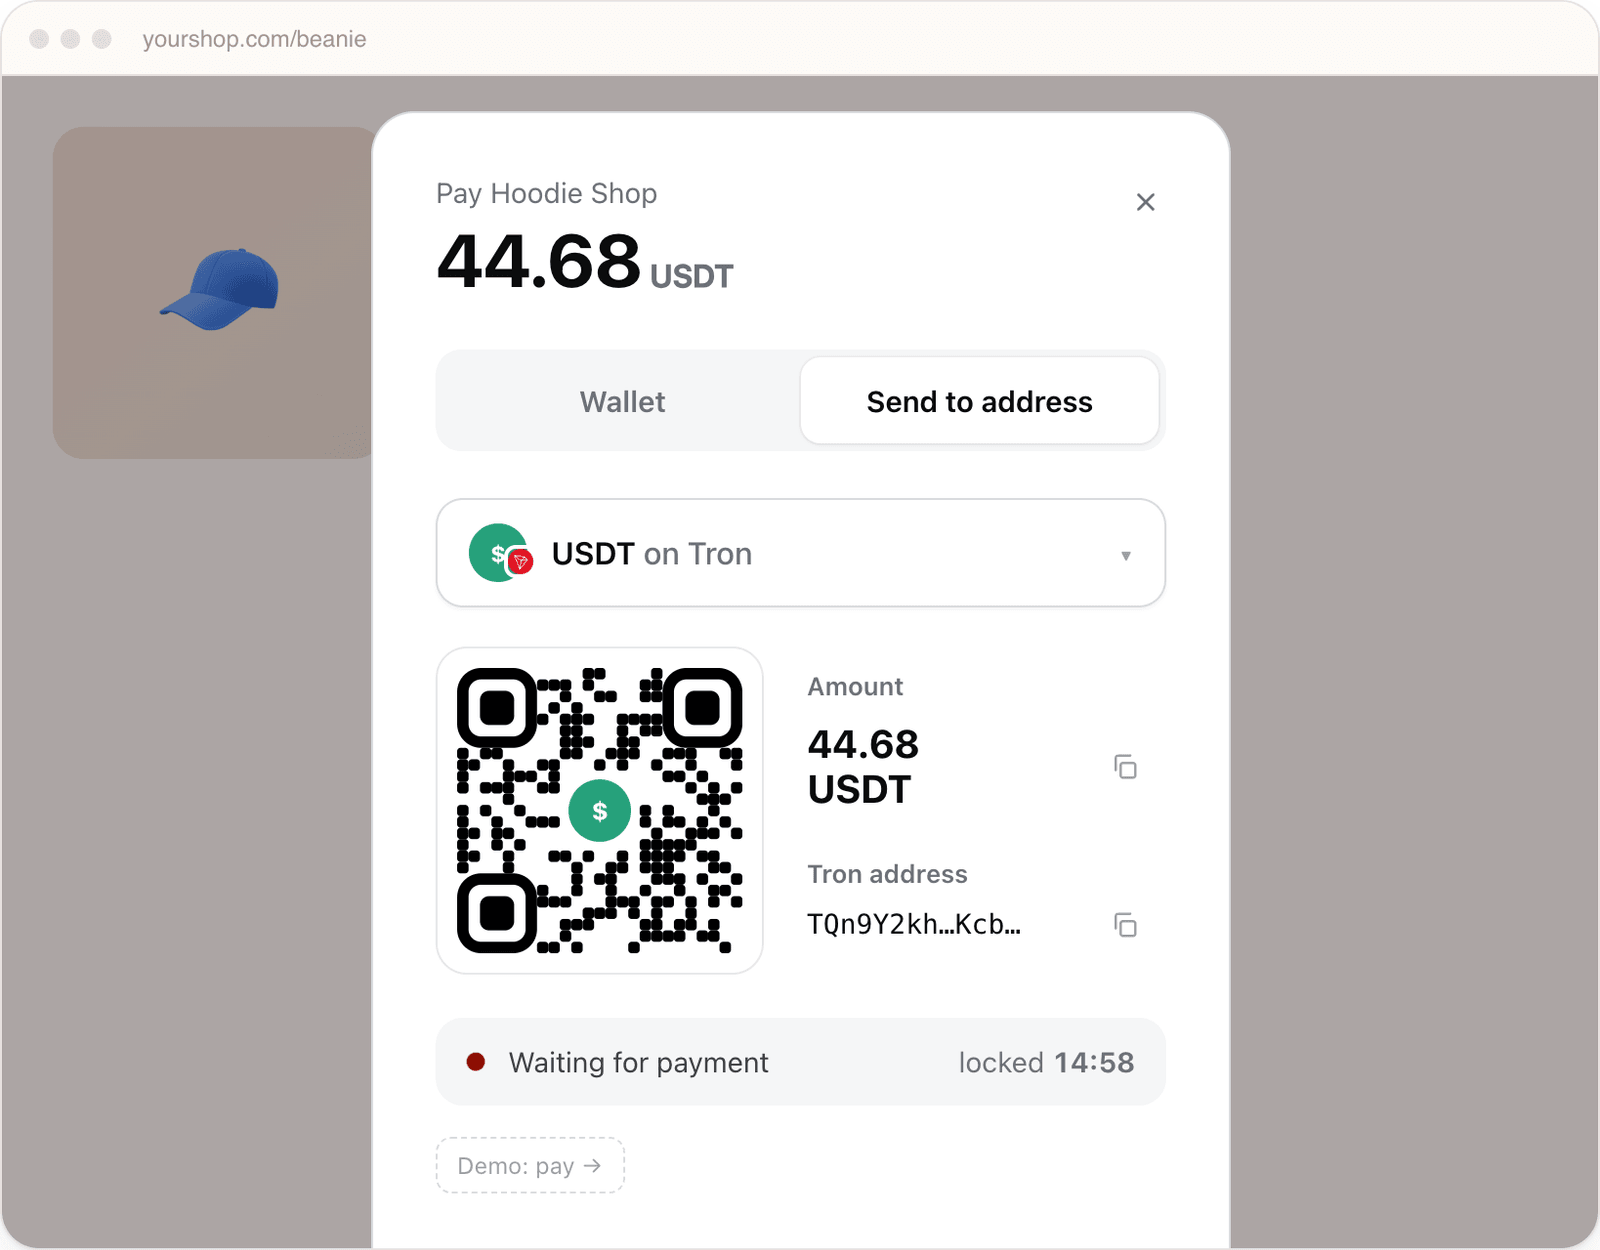
The buyer picks a coin and network, for example USDT on Tron, Bitcoin, Ethereum, Solana or Zcash. The checkout shows:
- a QR code to scan with a phone wallet or exchange app,
- the exact amount and the address, each with a copy button,
- a live status (“Waiting for payment”) and a timer for how long the quote is locked.
The buyer doesn’t have to press anything after sending. The checkout sees the payment arrive by itself.
Step 3: paid
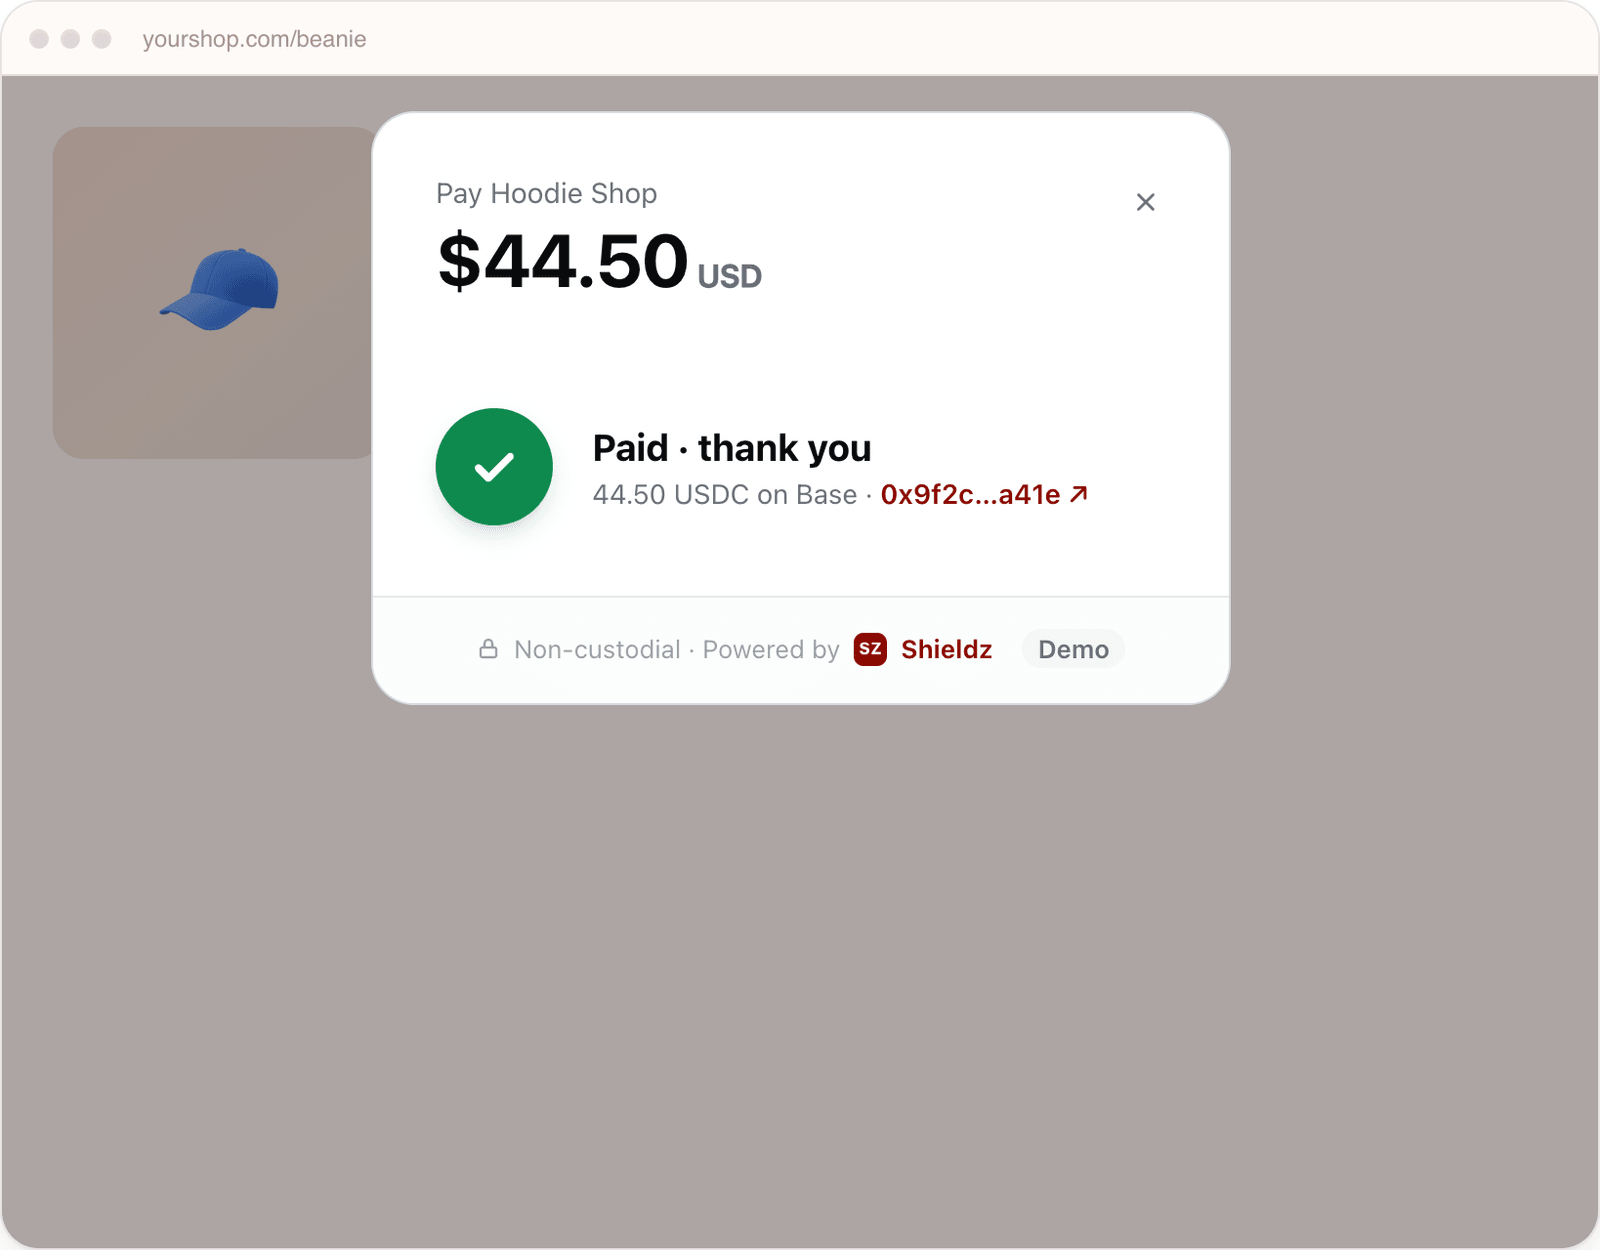
The buyer sees a clear “Paid” with the amount, the network and a link to the transaction on a block explorer. A popup closes by itself a moment later. At the same time your page gets a paid event and your server gets the signed webhook.
How to add a crypto payment widget
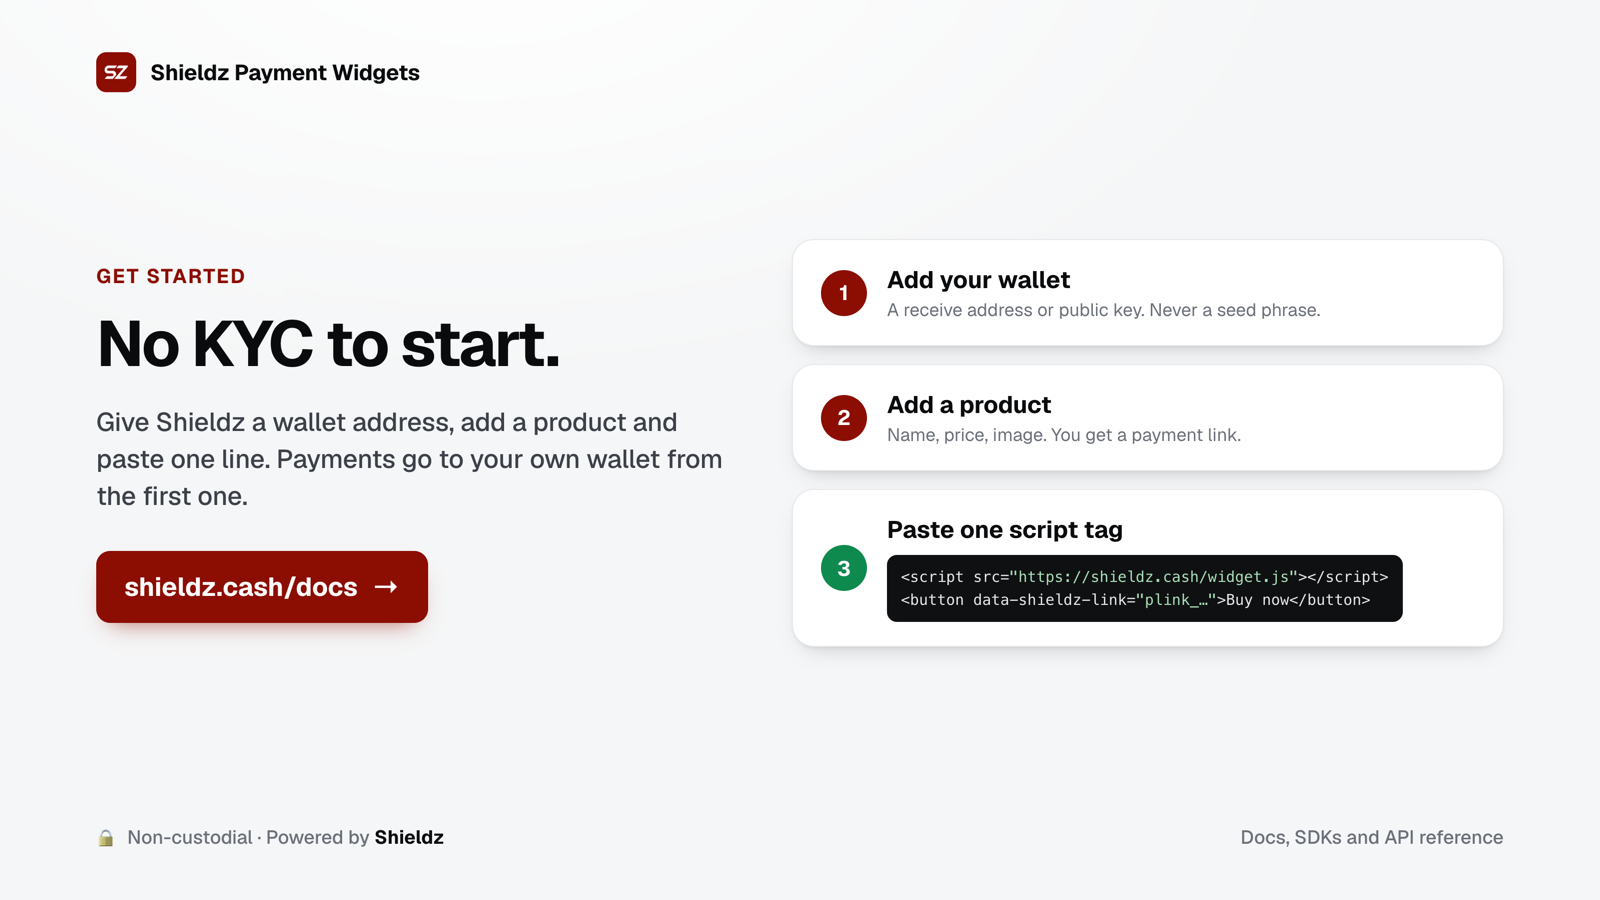
With Shieldz it takes three steps, and you don’t need KYC to start.
Step 1: add your wallet
Create a free account and add where you want to get paid: a receive address or a public key. Then choose what you receive:
- USDC or USDT on Base, Arbitrum, Optimism, Polygon or Ethereum
- native Bitcoin
- shielded Zcash
A widget should never ask for your seed phrase or private key. If one does, walk away.
Step 2: add a product
In the dashboard, open Products, add a name, a price and an image, then open Payment links and make a link for it. You get a plink_... id. For a cart, you’ll use the product’s price_... id instead.
Prices can’t be edited once they’re made. To change one, you add a new price, and it replaces the old one. That way an order always matches what the buyer saw when they paid.
Step 3: paste the code
Paste the script tag once per page, then the button, the div, or the Shieldz.checkout() call where you want the checkout. That’s a working checkout on any static site.
Step 4 (optional): fulfil orders automatically
When you want orders shipped, emailed or unlocked without you doing it by hand, add a webhook endpoint on your server. Shieldz sends a signed invoice.paid event with the invoice, its line items and your order id. Check the signature before you act on it:
import crypto from "node:crypto";

// Header: X-Shieldz-Signature: t=<unix>,v1=<hex>
function verify(rawBody, header, secret) {
  const parts = Object.fromEntries(header.split(",").map((p) => p.split("=")));
  const expected = crypto
    .createHmac("sha256", secret)
    .update(`${parts.t}.${rawBody}`)
    .digest("hex");
  return crypto.timingSafeEqual(Buffer.from(expected), Buffer.from(parts.v1));
}
The crypto payment API quickstart has the full Express handler. On the page itself, you can show a thank-you message when the payment lands:
Shieldz.on("paid", (e) => {
  // e.invoice is the invoice id. Show a thank-you; ship from the webhook.
});
Testing before you go live
Payment links and products always take real payments. To run a priced checkout without real money, create an invoice with an sk_test_... key and line_items, then use the dashboard’s simulate-payment tool. You get the real checkout and real webhooks, with no chain involved.
Adding it to WordPress, Webflow, Framer and React
The widget is plain HTML and JavaScript, so it works anywhere you can paste a script tag. Here’s where that is on common platforms.
WordPress
Add a Custom HTML block where the button should go and paste both lines: the script tag and the button. If you have several buttons on one page, the script tag only needs to be there once. If you run WooCommerce, the WooCommerce plugin adds Shieldz to the normal store checkout instead.
Webflow
Drag an Embed element onto the page and paste the button or the inline div. Put the script tag in the page’s custom code, before the closing </body> tag, or in the site-wide custom code if you’ll use it on many pages.
Framer, Squarespace, Carrd and other builders
Use the builder’s Embed, Code or Custom HTML block and paste the script tag and the button together. The video above shows exactly this flow in a website builder.
React and Next.js
Load the script once, then call the widget from your own components. You don’t need a wrapper library.
// app/layout.jsx (Next.js)
import Script from "next/script";

export default function RootLayout({ children }) {
  return (
    <html>
      <body>
        {children}
        <Script src="https://shieldz.cash/widget.js" strategy="afterInteractive" />
      </body>
    </html>
  );
}
// A buy button that opens a payment link as a popup
export function BuyButton({ link }) {
return <button onClick={() => window.Shieldz?.open({ link })}>Buy now</button>;
}For an inline checkout in a component, mount it into a ref:
import { useEffect, useRef } from "react";

export function InlineCheckout({ link }) {
  const ref = useRef(null);
  useEffect(() => {
    if (ref.current && window.Shieldz) window.Shieldz.mount(ref.current, { link });
  }, [link]);
  return <div ref={ref} />;
}
If you add data-shieldz-link or data-shieldz-inline elements to the page after it loads, call Shieldz.scan() to wire them up.
Matching your brand
Add data-accent with a hex color to a buy button or inline checkout to tint the checkout with your brand color:
<button data-shieldz-link="plink_..." data-accent="#2563eb">Buy now</button>Events you can listen to
| Event | When it fires |
|---|---|
open | The popup checkout opens |
state | The checkout moves to a new step |
paid | The payment is confirmed |
close | The buyer closes the popup |
error | Something failed, such as a missing key for Shieldz.checkout() |
Use Shieldz.on(event, fn) and Shieldz.off(event, fn). These are for the page’s look and feel. Orders should always be fulfilled from the server webhook.
Six things to check before you choose one
Most crypto payment widgets look alike. These are the differences that actually cost you money.
1. Who holds the money?
This is the big one. With a custodial gateway, buyers pay into the gateway’s wallet and you wait for a payout. The gateway can freeze that balance, ask for more documents, or go under with your money in it.
With a non-custodial gateway, the buyer pays your wallet directly. The gateway only watches the chain. Shieldz only ever gets a public key or address, so it can’t move your funds, and you can check that yourself. More on the difference in custodial vs non-custodial crypto payment gateways.
2. Can the buyer change the price?
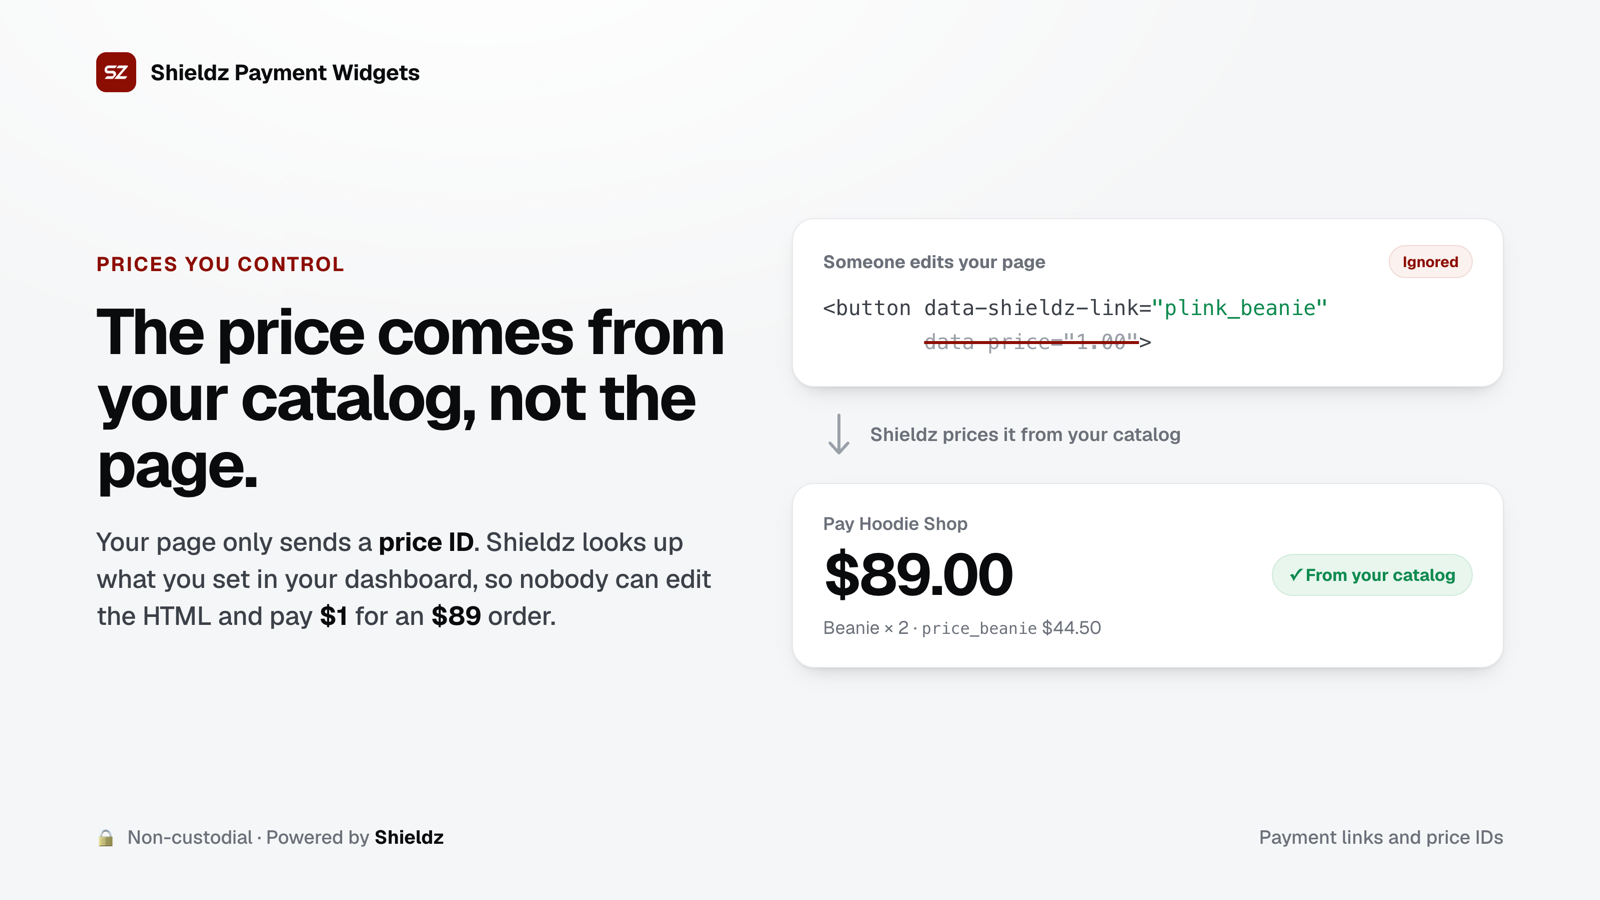
Anything in a web page can be edited by the person looking at it. If a widget reads the amount from your HTML, like data-price="89", a buyer can open the developer tools, change it to 1, and pay $1 for an $89 order.
A safe widget never takes the price from the page. Shieldz widgets send a payment link or price IDs, and the price is looked up in the catalog you set in your dashboard. Prices can’t be edited after they’re made either, so an order always matches what the buyer saw.
3. Which coins can buyers pay with?
Your buyers hold different things. Some have USDC on Base, some have ETH, some have Bitcoin on an exchange. A widget that only takes one coin on one chain loses the rest.
Look for two things:
- Both payment paths. A connect-wallet option for browser wallets, plus a QR code and address for exchanges and coins with no browser wallet, like Bitcoin and Zcash.
- Pay with any coin. The buyer pays in what they hold and you receive the one token you chose. Shieldz does this through independent, non-custodial swap protocols (NEAR Intents, Chainflip and Relay), and the token still lands in your wallet.
If stablecoins are the goal, see how to accept stablecoin payments.
4. What does it cost, and who pays?
The median crypto payment gateway charges 1% per payment, from our audit of 87 gateways, and some add payout or conversion fees on top. See the average crypto payment gateway fee for the full numbers, and the worked example below for Shieldz.
5. How do you know it was paid?
The “paid” screen in the buyer’s browser is not proof of payment. Browser events can be faked. Fulfil orders from a signed webhook sent to your server, and check the signature before you ship anything. How to verify crypto payments covers the tricks people use to fake one.
6. How heavy is it?
A checkout script loads on every page that has a button. Heavy scripts slow your page down and can hurt your search rankings. The Shieldz widget.js is about 14 KB, under 5 KB gzipped, with no dependencies, and it loads with defer, so it doesn’t block your page from showing. The checkout itself only loads when the buyer clicks.
The checklist at a glance
| Check | Red flag | What Shieldz does |
|---|---|---|
| Custody | Funds sit in the gateway’s wallet | Pays your wallet directly; Shieldz only has a public key |
| Price safety | Amount read from the page | Price comes from your catalog; prices can’t be edited |
| Coins | One coin on one chain | Wallet or QR, and pay with any coin |
| Fees | 1% or more, plus payout fees | $0 platform fee for you |
| Confirmation | Trusts the browser | Signed invoice.paid webhook |
| Page weight | Big bundle that blocks the page | Under 5 KB gzipped, loads with defer |
What it costs, with a worked example
- You pay no platform fee. A buyer paying in the coin you settle in sends it straight to you. Only the network fee applies.
- A buyer paying in a different coin through the widget pays 0.15%. It’s added to their total, so you still receive the full price. The swap protocols’ own spread and network fees apply to any swap.
- Checkout totals run from $1 to $100,000.
Example. You sell two beanies for $89 and settle in USDC on Base.
- A buyer who pays in USDC on Base pays $89 plus a small network fee. You receive 89 USDC.
- A buyer who pays in ETH pays $89 plus the 0.15% swap fee (about $0.13), plus the swap’s own spread and network fee. You still receive 89 USDC.
Compare that with a 1% gateway: on $10,000 a month of sales, 1% is $100 a month, or $1,200 a year, taken from you, not the buyer.
Free accounts show one short sponsored card on the hosted checkout’s confirmation screen. Embedded widget checkouts never show it. Pro ($99 a month) removes it from the hosted checkout too. Details are on the pricing page.
What people sell with it
A crypto payment widget fits anywhere a “buy” button does. A few common setups:
- Digital downloads. A buy button on each product page, and the webhook emails the file. See how to sell a PDF for crypto.
- SaaS and memberships. A buy button on the pricing page, and the webhook turns on the plan. See crypto payments for SaaS.
- Freelance work. An inline checkout on a “pay invoice” page. See crypto payments for freelancers.
- Games and in-game items. The cart flow with price IDs for each item. See crypto payments for games.
- Community access. A buy button that unlocks a role. See how to sell Discord roles for crypto.
- Physical goods. Your existing cart, with
Shieldz.checkout()at the last step and the order id passed through to the webhook.
Widget, payment link, API or plugin?
A widget isn’t the only way to take crypto. They all lead to the same checkout, so you can start with one and add another later.
| You have | Use |
|---|---|
| A website and want buyers to stay on it | Payment widget (buy button, inline, or cart) |
| No website, or you sell in DMs, email or social | Payment link: share the URL, no code at all |
| A backend that already computes totals | Payment API: create invoices with your secret key and line_items |
| A WooCommerce store | WooCommerce plugin |
| An AI agent that needs to charge | Keyless payment links or the MCP server |
Common mistakes
Shipping from the browser event. The paid event on the page is for showing a thank-you message. Anyone can fire JavaScript in their own browser. Ship from the signed webhook.
Putting a secret key in the page. The page only ever needs a publishable pk_live_... key, and only for the cart flow. Secret sk_... keys belong on your server. If one ends up in your HTML, delete it in the dashboard and make a new one.
Taking the amount from the page. If you build your own button, don’t send a price from the browser. Use a payment link or price IDs so the total comes from your catalog.
Loading the script many times. Once per page is enough. Extra copies are skipped, but they’re still wasted bytes.
Forgetting the order id. In the cart flow, pass your own order id. It comes back in the webhook, which makes matching payments to orders easy.
Trying a live link with real money. Use a test invoice with an sk_test_... key and the simulate-payment tool instead.
Get started
- Create a free account and add your wallet.
- Add a product and make a payment link.
- Paste the script tag and a button.
The widget docs have every option, and the launch post has more on how the widgets work. For the bigger picture, read how to accept crypto payments.
FAQ
What is a crypto payment widget? A small script you add to your website that shows a crypto checkout, as a popup or inside your page, so buyers can pay in crypto without leaving your site.
Do I need a backend to use a crypto payment widget? No. A buy button or inline checkout with a payment link works on any static site. Add a webhook endpoint when you want orders fulfilled automatically.
Is a crypto payment widget safe? It depends on the gateway behind it. Choose one that is non-custodial, never asks for your seed phrase, takes the price from your catalog instead of the page, and confirms payments with signed webhooks.
Can buyers pay with Bitcoin? Yes. The checkout shows a Bitcoin address and QR code with the exact amount and notices the payment by itself. You can also choose to receive native Bitcoin.
Can buyers pay from an exchange like Binance or Coinbase? Yes. They pick Send to address, copy the amount and address, and withdraw from the exchange. The checkout sees the payment arrive.
Does it work on WordPress, Webflow or Framer? Yes. It works anywhere you can paste HTML and a script tag. See the platform section above.
Does it work on phones? Yes. The checkout fits small screens, and buyers on a phone can open it in their wallet app or scan the QR code from another device.
How much does a crypto payment widget cost? With Shieldz, you pay no platform fee. A buyer who pays in a different coin than you settle in pays 0.15%, added to their total.
Can I change a price later? Yes. Add a new price to the product and it replaces the old one. Orders already paid keep the price they were paid at.
Does the widget show ads? No. Embedded checkouts never show the sponsored card.
Do I need KYC? Not to start. You add a wallet and a product and you can take payments.
